In this article we will discuss about large scale and small scale vermicomposting.
Large Scale Vermicomposting:
Large scale vermicomposting is practised in developed countries like Canada, Italy, Japan, Malaysia, the Philippines, and the United States. The vermicompost may be used for farming, landscaping, to create compost tea, or for sale. Some of these operations produce worms for bait and/or home vermicomposting.
There are three main methods of large-scale vermi- culture:
(1) Windrow system,
ADVERTISEMENTS:
(2) Raised bed, and
(3) Flow-through system.
(1) Windrow System of Earthworm Farming:
In this type of farming, windrows are usually constructed on a concrete surface. It may be in a pit or may be on soil surface. Windrows are linear piles on the ground containing feed-stocks up to 3 feet high. If the floor is made up of cement, then earthworm bed will be prepared with soil, straw, leaves, fertilizer, etc.
ADVERTISEMENTS:
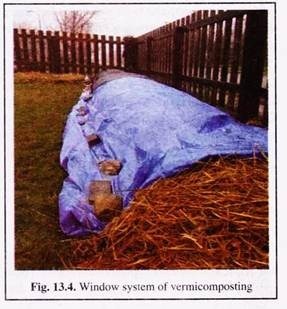
They are being used extensively both in the open and under cover, but require either a lot of land or large buildings. During composting process the whole pile is covered by a PVC sheet to prevent predators and environmental hazards (Fig. 13.4).
Windrow system is used for the production of compost by piling organic matter or biodegradable waste, such as animal manure and crop residues, in long rows (windrows). This method is suited to producing large volumes of compost. After composting, these rows are generally turned to an organic material with improved porosity and oxygen content.
Mixing in or removal of moisture, and redistribution of cooler and hotter portions of the pile makes the compost suitable for agricultural use. Windrow composting is a commonly used in farm scale composting method.
ADVERTISEMENTS:
Composting process control parameters include the initial ratios of carbon and nitrogen rich materials, the amount of bulking agent added to assure air porosity, the pile size, moisture content, and turning frequency. The temperatures of the windrows must be measured and logged constantly to determine the optimum time to turn the windrows for quicker compost production.
(2) Raised Bed Earthworm Farming:
In this type of farming, soil of the floor will be raised with the help of axes to prepare a bed. Bedding is any material that provides a relatively stable habitat to worms.
A good bedding for vermicomposting should possess:
(a) High Absorbancy:
As worms breath through skin, the bedding should be able to absorb and retain adequate water.
(b) Good Bulking Potential:
It is the property which ensures proper oxygen supply to the worms.
(c) Low Nitrogen Content (High Carbon: Nitrogen Ratio):
ADVERTISEMENTS:
Although worms consume their bedding as it breaks down, it is very important that this be a slow process. High protein/nitrogen levels can result in rapid degradation and associated heating may be fatal to worms.
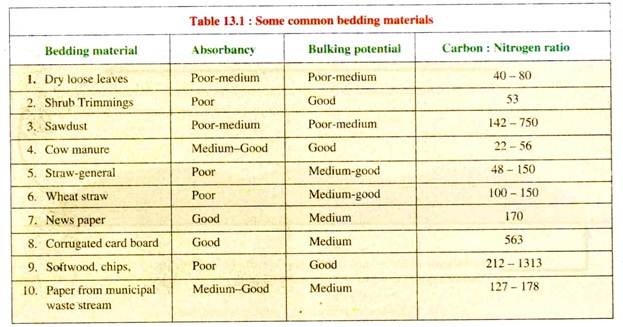
Some common bedding materials are given in the table 13.1:
On the top of the bed, worm chow of about one inch thickness will be spread. Worm chows are artificial feed for the earthworm.
The ingredients of worm chow are – ground corn, ground soybean hulls, wheat middling, dehydrated alfalfa, cane molasses, calcium carbonate, porcine meat meal, dehulled soybean meal, ground oats, ground wheat, di-calcium phosphate, mono-calcium phosphate, fish meal, dried beet pulp, wheat germ, corn gluten meal, salt, soybean oil, porcine animal fat preserved with BHA, folic acid, choline chloride, DL-alpha tocopheryl acetate, riboflavin, pyridoxine hydrochloride, nicotinic acid, menadione dimethyl-pyrimidinol bi-sulphate, calcium pantothenate, vitamin B-12 supplement, vitamin A acetate, manganous oxide, zinc oxide, ferrous carbonate, copper, sulfate, zinc sulfate, calcium iodate. cobalt carbonate. The worm chow is commercially available in the market.
A location of raised bed farming is preferably a shady spot so that one can keep the bed somewhat moist. If it is a full sun area there should be provision to cover with a few inches of mulching material to protect earthworms from the sun and to retain moisture.
Leaves, newspaper, straw will work fine for this purpose. The most convenient width for the short sides of an earthworm bed is 3 feet. For length, worm growers generally construct beds of at least 8 feet. If beds are longer than 8 feet, some growers like to install dividers every 8 to 10 feet for ease in dividing, harvesting, cleaning, or feeding.
The raised bed depth should be 12 to 24 inches. If continuous freezing or excessively hot temperatures occur in the area, consider building beds 12 to 24 inches below ground where the constant ground temperature will keep the worms from freezing or overheating. The underground bed will be made by digging soil of suitable length (Fig 13.23).
The wall of the pit should be covered with PVC lining. Then from below the layers of various thickness of coconut fibres (2 inches), wood dust (2 inches), agro waste and dung (15 inches), and leaf or straw (6 inches) are placed. The ideal distance between beds is 3 feet. This allows room for manually or mechanically operated equipment to be used between the beds for feeding, harvesting, or cleaning.
(3) Flow through System of Earthworm Farming:
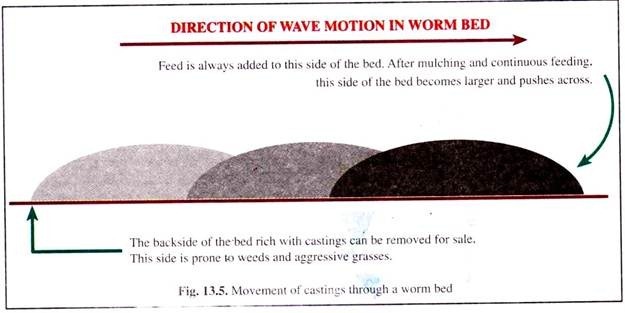
This system is well suited to indoor facilities. In indoor space the concrete surface is constructed in the pit to prevent predators gaining access to the worm population. The dimension of the pit should be 3 feet x 8 feet. The feed is initially dumped in one corner of the pit (Fig. 13.5).
The worms are introduced into the pile of the feed and kept for some days. Morning or evening is the best time to add worms. The lengthwise direction of the earthworm beds and their shelters should parallel the prevailing winds.
For example, if the wind generally blows from west to east, the beds should be laid out in a west-east direction. This will prevent intense winds from hitting the largest part of the shelter and will help prevent covers, if they are used, from blowing off.
When the bed is rich with casts then another stock of feed is placed in front of the previous dump, so that the worms can migrate to the new feed (Fig. 13.5). The castings can be removed from the previous dump. The flow through system eliminates the need to separate worms from the casting before packaging, because the worms are already moved forward to the new feed pile.
Construction of Vermicompost Pits in Rural Bengal:
In rural Bengal, pits are usually constructed in a shaded area, either under a tree or under a shed.
There are two types of pits, which are constructed depending upon the requirement and space availability of the composters:
(i) Four-tank system and
(ii) Two-tank system. Each compost pit of any convenient dimension can be dug.
(i) Four-Tank System:
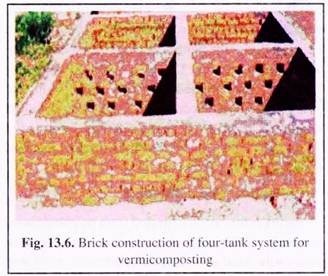
A tank of4mx4mxlm (length x breadth x height) dimension is preferably made under the shade of a tree (Fig. 13.6). This is then divided into four equal parts with brick walls that have vents to facilitate aeration as well as migration of earthworms from one tank to another.
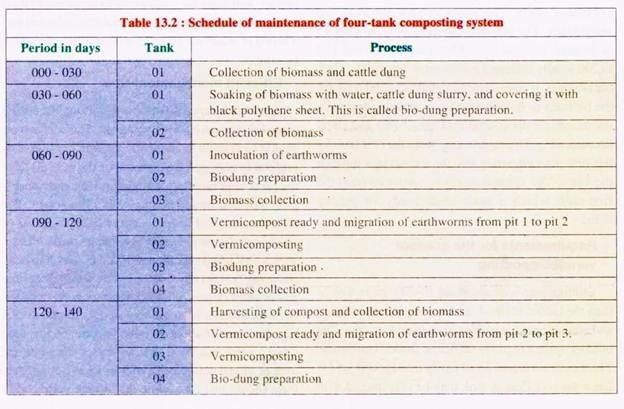
This unit is designed especially for the small farmer who approximately collects 20 to 30 kg of cattle or farm waste per day. After construction, the tanks should be marked as 1, 2, 3 and 4. The loading of bio-dung and vermibed should be carefully maintained. The schedule of loading the unit is described in the Table 13.2.
To simplify the loading procedure for composting in rural sectors where the availability of organic material is insufficient, a four-tank system can be set up based on a combination of bio-dung composting method and vermitech technique. This process enables continuous compost production using cattle dung produced daily at cattle sheds, weeds, leaf litter and other farm waste.
(ii) Two-Tank System:
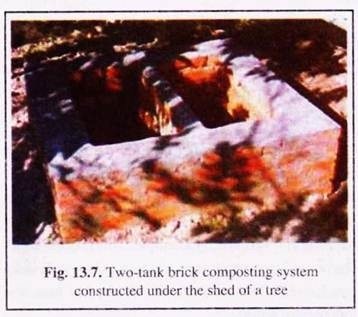
In this system a smaller tank of 1 m x 1 m x 1 m’ (length X breadth x height) dimension is made with the brick above ground under shade (Fig. 13.7). The tank is divided into two equal halved units vertically by a wall containing vents. The two-tank system is recommended for little household garbage or less quantity of farm waste.
Schedule of Maintenance of Two Tank Composting System:
An average family produces 250 to 500 gm of garbage that is added daily into one of the tanks. After a few days when a layer is formed, 15 to 20 cm dry/green leaves and a thin layer of soil are placed to cover it. Another layering of waste, over a period of time, follows this and it takes about two months for the tank to be filled. This is then covered with a black polythene sheet. The waste is now added to the second tank.
The polythene sheet is removed after 15 to 20 days, allowed to cool for a day, and about 150 to 200 locally collected earthworms are released into the biomass. It takes approximately 45 to 60 days for the biomass to be converted into vermin-compost.
In the meantime the second tank gets filled and starts decomposing. The earthworms from the first tank by this time start migrating into the second tank through the vents. The vermin-compost is harvested from the first tank, which is again made ready for getting filled.
Requirements for the Outdoor Vermicomposting:
Outdoor plan requires about 10-20% more worms than the indoor method, as there are more predators and other climatic variables in open tank system. The outdoor system requires sufficient shaded land space.
The most convenient pit of easily manageable size is 2m x lm x 0.75m. A tank may be constructed with brick and mortar with proper water outlets, or a plastic crate (600 mm x 300 mm x 300 mm) with holes drilled at the bottom.
The pit is made ready by setting vermibed (Fig. 13.22). The vermibed is sprinkled with water at regular interval. Then composter earthworm is introduced (Fig. 13.20). After few days when the compost is ready for harvesting, the vermicompost is collected and composting material is replaced (Fig. 13.21).
Collection of Earthworms:
Earthworms can be collected from neighbourhood or can be obtained from nurseries. One can also contact the local agricultural department, municipalities, and nurseries of the forest departments for earthworms. Since earthworms have acquired economic importance, one can also check in the firms/horticultures/nurseries, which deal in selling of earthworms.
But it is always desirable to collect it from composter themselves from the locality. The composter should locate the earth-worm castings over the soil of his/her locality. The stem of the “bish katali tree” (Polygonum hydropiper), is crushed and an aqueous extract made. The spray of this aqueous extract will force the earthworm to come out of their hideout. Then the earthworms could be collected and washed in water for 10 to 15 minutes for vermicomposting.
Efficient Management Tips:
Handful lumps of fresh cattle dung should be placed at random over the vermibed. The compost pit should be layered to about 50 mm with dry leaves or preferably chopped hay/straw. For the next 30 days the pit is kept moist by watering it whenever necessary. The bed should neither be dry nor soggy.
The pit is then covered with coconut or Palmyra leaves or an old jute (gunny) bag to discourage birds. Plastic sheets on the bed should be avoided as they trap heat. After the first 30 days, wet organic waste of animal and/or plant origin from the kitchen or hotel or hostel or farm, that has been pre-digested, is spread over it to a thickness of about 50 mm.
This can be repeated twice a week. All these organic wastes can be turned over or mixed periodically with a pickaxe or a spade. Care should be taken not to disturb the vermibed in which the worms live. Garbage should be added till the compost pit is nearly full.
Pit should be kept moist for another 30 to 45 days. Turning over the material in the pit should be done with care avoiding injury to the worms. Turning over can be done on every fifth or seventh day with the help of a forked spade.
Regular watering should be done to keep the right amount of moisture in the pits. In 60 to 90 days time the compost should be ready as indicated by the presence of earthworm castings (vermicompost) on the top of the bed. The compost should be turned occasionally since this allows for aeration. If the weather is very dry it should be dampened periodically. The pile should be moist, not wet and soggy. Vermicompost can now be harvested from the bin/ pit.
Small Scale Culture of Vermicomposting:
Construction of Vermicompost Pits in Backyard or Indoor Spaces:
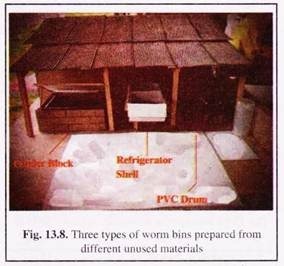
Bins can be made from different unused household materials. Among various materials three types of bins built from different materials are shown in Fig. 13.8. These are Cinder blocks, Refrigerator shell, PVC drum. The idea of using a refrigerator shell is proved good. Worms in bins need three basic things: food, ventilation and drainage.
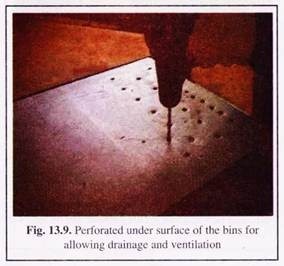
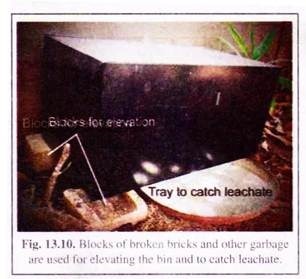
The back of the fridge is perforated (Fig. 13.9), which will be the bottom of the worm bin to allow for drainage. Ventilation will come through the top. The bin is placed on broken cinder blocks to elevate it and improve drainage (Fig. 13.10). The leachate that seeps out is full of nutrients for plants.
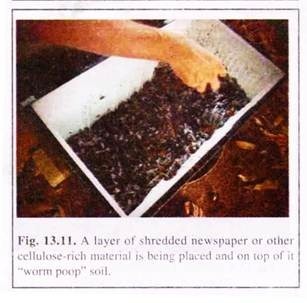
It may be drained into the soil to feed plants in the garden. The making of vermibed requires some steps to follow. First, a layer of shredded newspaper or other cellulose-rich material like coconut husk is placed at the bottom (Fig. 13.11).
Then on it is sprinkled the “worm poop” soil through which worms come in. Then the worms are released in the bed. The next layer is food scraps. On top of it all, is placed another layer of shredded newspaper and covered with a damp towel.
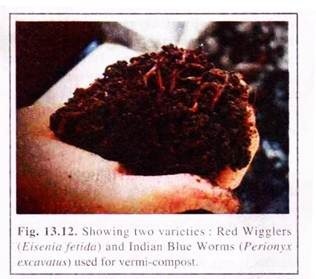
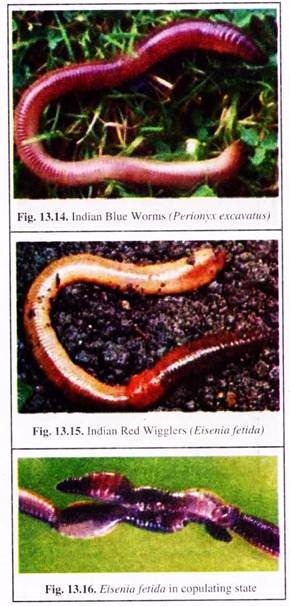
Vermiculture with Red Wigglers (Eisenia feti-da) and Indian Blue Worms (Perionyx excavatus) reduces household waste and converts it into fertiliser. The figure 13.12 shows a handful of two worms. They are very difficult to differentiate but both are wriggling around.
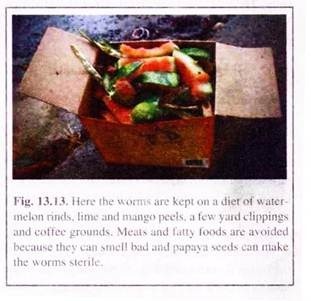
One can also start vermiculture in a small area on a diet of watermelon rinds, lime and mango peels in our country near small garden (Fig. 13.13). One should avoid meats and fatty foods because they can smell bad. Papaya seeds can make the worms sterile, so it also should be avoided. The worms should be fed on alternate days.
They need food at least once per week, and more the feeding, the better will be the result. They can eat food up to their own weight every day. The shredded newspaper should be made damp with water at regular interval.
Feed Stock for Small Scale Culture:
Small-scale vermicomposting is well suited to turn kitchen waste into high-quality soil amendments, where space is limited. Worms can decompose organic matter without the additional human physical effort. Such systems usually use kitchen and garden waste, utilising earthworms and other micro-organisms to digest organic wastes, such as kitchen scraps.
This includes all fruits and vegetables (including citrus and other “high acid” foods); vegetable and fruit peels and ends; coffee grounds and filters; tea bags (even those with high tannin levels); grains, such as bread, cracker and cereal (including mouldy and stale); eggshells (rinsed off); leaves and grass clippings (not sprayed with pesticides).
Composting worms, which are detritivorous (eaters of trash), such as the red wiggler Eisenia fetida are epigeic:
(1) Indian Perionyx excavatus (Fig. 13.14) is epigeic type earthworm. Its ectodermal layer is provided with dense pigmented granules, which makes its colour deep dark. These animals are also called as litter species. Common earthworms, e.g., Eutyphoeus gammiei, Lampito mauritii, Metaphire houlleti, and Lumbricus terrestris are anecic (deep burrowing) species and hence unsuitable for use in a closed system. Other soil species that contribute include insects, other worms and moulds.
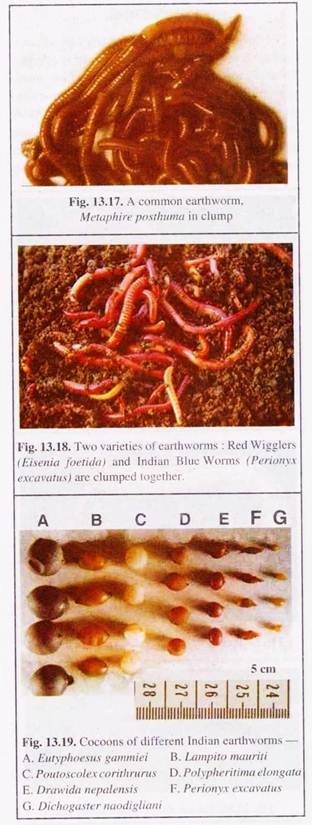
(2) There is another variety of earthworm, known as endogeic variety. These are living in the deep and horizontal burrow of the soil. They prefer soil with inorganic materials. Their body is lightly pigmented. Metaphire posthuma (Fig. 13.17), Pheretima elongata, Pontoscolex corithrurus, are species of endogeic variety. These are not suitable for vermi-composting.
Feedstock for Large-Scale Culture:
There are few food wastes that earthworms cannot compost, although meat waste and dairy products are likely to putrefy, and in outdoor bins can attract vermin. Green waste should be added in moderation to avoid heating the bin.
Such vermi-composting systems need reliable sources of large quantities of food. This system presently uses dairy cow or pig manure; sewage sludge; agricultural waste; food processing and grocery waste; cafeteria waste; grass clippings and woodchips as feedstock.
Climate and Temperature:
The most common worms used in composting systems is red worms [Eisenia foetida (Fig. 13.15 and 13.16), Eisenia andrei, and Lumbricus rubellus] who feed most rapidly at a temperature of 15°C-25°C. They can survive at 10°C. Temperature above 30°C may harm them. This temperature range means that indoor vermi-composting with red worms is suitable in tropical climates.
Other worms like Perionyx excavatus are suitable for warmer climates. If a worm bin is kept outside, it should be placed in a sheltered position away from direct sunlight and insulated against frost in winter. It is necessary to monitor the temperature of large-scale bin systems. In warmer climate Eiseina foetida and Perionyx excavatus are used together (Fig. 13.18) for successful vermi-composting.
Harvesting:
Vermi-compost is ready for harvest when it contains few-to-no scraps of uneaten food or bedding. There are several methods of harvesting from small- scale systems: “dump and hand sort”, “let the worms do the sorting”, “alternate containers” and “divide and dump”.
These differ on the amount of time and labour involved and whether the vermi-composter wants to save as many worms as possible from being trapped in the harvested compost.
It will be wise to try to pick out as many eggs/cocoons as possible and return them to the bin during harvesting. Cocoons are small, lemon-shaped yellowish objects that can usually be seen pretty easily with the naked eye and picked out.
The top of the bed is harvested from pit in case of large-scale culture. The material should be placed in a heap in the sun so that most of the worms move down to the cool base of the heap. The compost is then sieved before being packed. The earthworms and the thicker material, which remains on top of the sieve, will be returned back in the bin and the process starts again.
